Generate dynamic form letters with R and Microsoft Word

If you've ever been tasked with completing a form letter in Microsoft Word, you probably know how tedious it can be. Sometimes letters and documents can be generated with software and tools – like the Mail Merge function within Microsoft Word, for example – but other times, documents with multiple nuanced fields are often just completed when needed.
One solution to completing heavily nuanced form letters could be found in R using the officer package from David Gohel. This brief tutorial creates a template job offer letter and uses R to complete its placeholder fields. You can find the tutorial code and files here if you are interested in reproducing the examples. First, we start with creating the template document.
Step 1: Prepare the Word Document
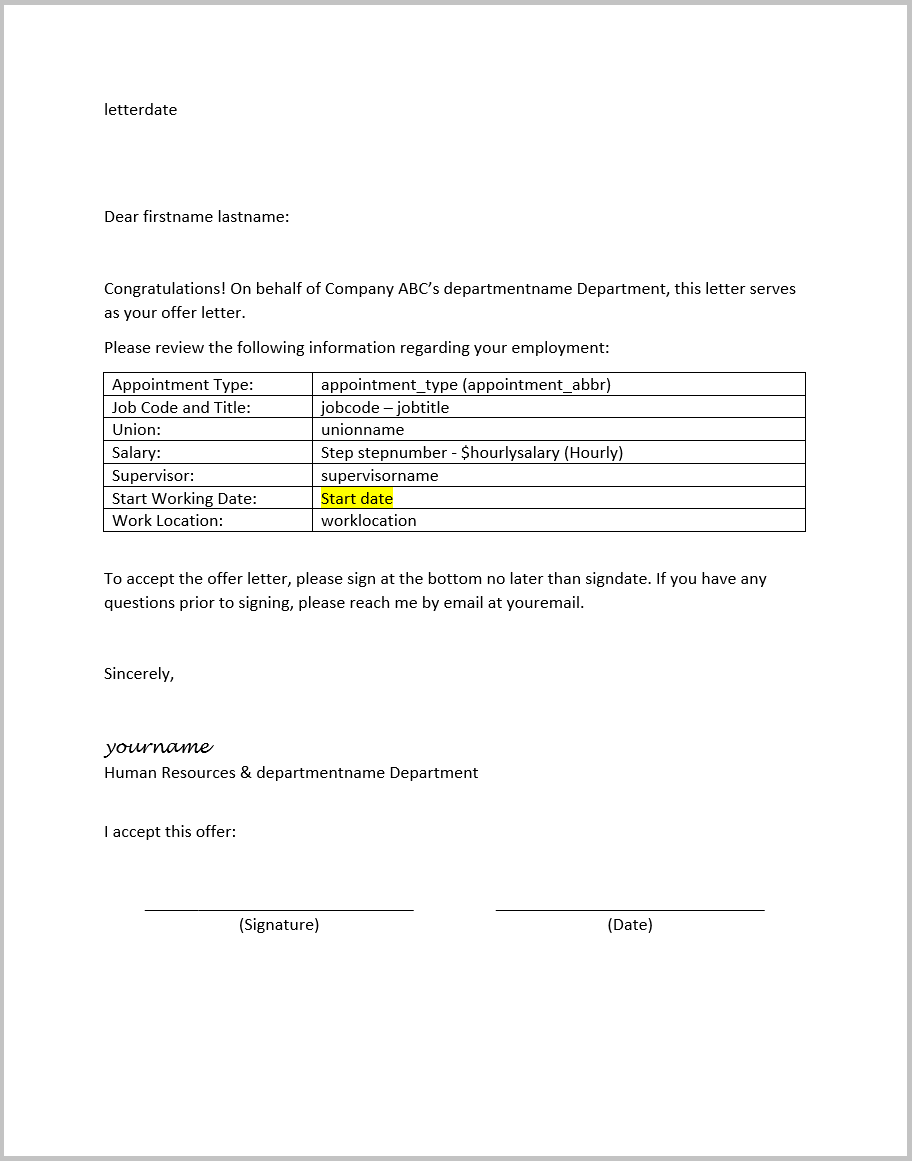
The method used to change our placeholder text is essentially a "find and replace" function. For this reason, it is important to use placeholders that are unique and are not partially (or fully) used elsewhere in the document. For example, using "appointment_type" and "appointment_type_abbr" as placeholders would not work because the function will incorrectly match the first merge field to the second. For this reason, we use "appointment_type" and "appointment_abbr" to avoid an unintentional mix-up.
For this tutorial, the below offer letter template will be used as an example.
Step 2: Write the R Script
# load packages

library(tidyverse)
library(readxl)
library(lubridate)
library(officer)We'll start the script by loading the above four libraries. However, before loading the packages, you'll need to install each with the "install.packages" function. More information on how to install packages can be found here.
# load data tables

positions_data <- read_excel("positiondata.xlsx", sheet = "positions")
union_data <- read_excel("positiondata.xlsx", sheet = "unions")
appointment_data <- read_excel("positiondata.xlsx", sheet = "appointment_type")
department_data <- read_excel("positiondata.xlsx", sheet = "departments")Next, we load relevant data tables. In the above code, tables are loaded from an external Excel file. For this example, we'll use fictitious data from the four tables – "position_data", "union_data", "appointment_data", "department_data".
# create a function for inputs

offerletter_inputs <- function(your_name, your_email, candidate_first_name, candidate_last_name, department_id, job_code, salary_step, appointment_type, supervisor, work_address) {

  your_name <- your_name
  your_email <- your_email
  candidate_first_name <- candidate_first_name
  candidate_last_name <- candidate_last_name
  department_id <- department_id
  job_code <- job_code
  salary_step <- salary_step
  appointment_type <- appointment_type
  supervisor <- supervisor
  work_address <- work_address

  # create single row table with input information
  df <- tibble(your_name = your_name,
               your_email = your_email,
               candidate_first_name = candidate_first_name,
               candidate_last_name = candidate_last_name,
               department_id = department_id,
               job_code = job_code,
               salary_step = salary_step,
               appointment_type = appointment_type,
               supervisor = supervisor,
               work_address = work_address)


  # join position information
  df <- left_join(df, positions_data, by = c("job_code" = "Job Code"))

  # determine hourly rate
  df <- df %>% mutate(hourly_salary = df[[1,14+df$salary_step]])

  # join union information
  df <- left_join(df, union_data, by = "Union Code")

  #join appointment information
  df <- left_join(df, appointment_data, by = c("appointment_type" = "abbreviation"))

  #join department information
  df <- left_join(df, department_data, by = c("department_id" = "Department ID"))

  return(df)
}After loading our data tables we'll then write a function for our user inputs. In the above example, 10 inputs are used to return a single row table. The job code and department ID inputs are then used to lookup information from the tables loaded previously using various join and mutate functions. The result is a single row table with 21 inputs/variables – many of which will be later entered into our form letter.
# write find-and-replace function

offerletterfunciton <- function(offerinputs) {

  # read the offerletter and bring to environment
  df <- read_docx("offerletter.docx")

  # funcitnos to find and replace merge text (16 total)

  # replace "letterdate" with today's date
  df <- body_replace_all_text(df,
                              old_value = "letterdate",
                              new_value = paste0(month(today(), label = TRUE, abbr = FALSE ), " ", day(today()),",", " ", year(today())))

  df <- body_replace_all_text(df,
                              old_value = "firstname",
                              new_value = inputs$candidate_first_name)

  df <- body_replace_all_text(df,
                              old_value = "lastname",
                              new_value = inputs$candidate_last_name)

  df <- body_replace_all_text(df,
                              old_value = "departmentname",
                              new_value = inputs$`Department Name`)

  df <- body_replace_all_text(df,
                              old_value = "appointment_abbr",
                              new_value = inputs$appointment_type)

  df <- body_replace_all_text(df,
                              old_value = "appointment_type",
                              new_value = inputs$appointment)

  df <- body_replace_all_text(df,
                              old_value = "jobcode",
                              new_value = as.character(inputs$job_code)) #change numeric variables to character

  df <- body_replace_all_text(df,
                              old_value = "jobtitle",
                              new_value = inputs$`Job Title`)

  df <- body_replace_all_text(df,
                              old_value = "unionname",
                              new_value = inputs$Union)

  df <- body_replace_all_text(df,
                              old_value = "stepnumber",
                              new_value = as.character(inputs$salary_step))

  df <- body_replace_all_text(df,
                              old_value = "hourlysalary",
                              new_value = as.character(inputs$hourly_salary))

  df <- body_replace_all_text(df,
                              old_value = "supervisorname",
                              new_value = inputs$supervisor)

  df <- body_replace_all_text(df,
                              old_value = "worklocation",
                              new_value = as.character(inputs$work_address))

  df <- body_replace_all_text(df,
                              old_value = "signdate",
                              new_value = paste0(month(today()+5, label = TRUE, abbr = FALSE ), " ", day(today()+5),",", " ", year(today()+5)))

  df <- body_replace_all_text(df,
                              old_value = "yourname",
                              new_value = inputs$your_name)

  df <- body_replace_all_text(df,
                              old_value = "youremail",
                              new_value = inputs$your_email)


  return(df)

}Once we have our input function written, we'll next write our "find and replace" function. In the above example, the Word document is read, and a "body_replace_all_text" function (from the officer package) is written for each placeholder in our letter.
# provide user iputs

inputs <- offerletter_inputs(
  your_name = "Matthan Churchill",
  your_email = "matthan@email.com",
  candidate_first_name = "Jane",
  candidate_last_name = "Doe",
  department_id = 456,
  job_code = 300,
  salary_step = 1,
  appointment_type = "PERM",
  supervisor = "Jane Smith",
  work_address = "1234 1st Street"
)In the above R code, we call the "offerletter_inputs" function we created earlier and supply the necessary inputs. This effectively creates the 21 variable table mentioned before.
# run the find-and-replace function

offerletter <- offerletterfunciton()

# save the offer letter

print(offerletter, target = glue::glue("Offer Letter - {inputs$candidate_first_name} {inputs$candidate_last_name} ({inputs$appointment_type} {inputs$job_code}).docx"))
In our final step, we run the "find and replace" function and save the offer letter. The code above uses the "glue" function to concatenate fields from our inputs table into the document's file name. The result is a form letter that is dynamically filled and saved with our chosen naming convention.
Beyond the Script
One limitation to putting together an R script that generates dynamic form letters is that running the script requires some working knowledge of R. Providing the script to non-R users would require the addition of detailed instructions on how to install R, the packages, and run the code. However, we can avoid this and include non-R users by working our above code into a Shiny application.
Shiny is an R package that makes it possible to create web applications in a snap. For example, using Shiny, we can create a web application that utilizes our script to allow users to generate dynamic form letters right from their web browser.
The Shiny Package
The Shiny application will utilize much of the R code that we've already written. In particular, we will load the same packages, data, and function, though we will need to make a few changes to our code along the way.
# load libraries

library(tidyverse)
library(readxl)
library(lubridate)
library(officer)
library(shiny)We'll first load the packages, this time also including the Shiny package as shown above.
# load table data

positions_data <- read_excel("positiondata.xlsx", sheet = "positions")
union_data <- read_excel("positiondata.xlsx", sheet = "unions")
appointment_data <- read_excel("positiondata.xlsx", sheet = "appointment_type")
department_data <- read_excel("positiondata.xlsx", sheet = "departments")# write function for inputs
offerletter_inputs <- function(your_name, your_email, candidate_first_name, candidate_last_name, department_id, job_code, salary_step, appointment_type, supervisor, work_address) {
your_name <- your_name
your_email <- your_email
candidate_first_name <- candidate_first_name
candidate_last_name <- candidate_last_name
department_id <- department_id
job_code <- job_code
salary_step <- salary_step
appointment_type <- appointment_type
supervisor <- supervisor
work_address <- work_address
# create single row table with input information
df <- tibble(your_name = your_name,
your_email = your_email,
candidate_first_name = candidate_first_name,
candidate_last_name = candidate_last_name,
department_id = department_id,
job_code = job_code,
salary_step = salary_step,
appointment_type = appointment_type,
supervisor = supervisor,
work_address = work_address)
# join position information
df <- left_join(df, positions_data, by = c("job_code" = "Job Code"))
# determine hourly rate
df <- df %>% mutate(hourly_salary = df[[1,14+df$salary_step]])
# join union information
df <- left_join(df, union_data, by = "Union Code")
#join appointment information
df <- left_join(df, appointment_data, by = c("appointment_type" = "abbreviation"))
#join department information
df <- left_join(df, department_data, by = c("department_id" = "Department ID"))
return(df)
}After our packages are loaded, we then load the relevant data and copy in our look-up function. The above lines of code are for the same data loading and look-up function that we wrote earlier.
The rest of our code will need to be rewritten along with the Shiny application – though much of it will be similar to what was written before. The Shiny application code is typically written in two separate sections – the UI (user interface) section, and the server section. The UI will serve as the application's front end, where information can be seen and/or entered by an end-user. The server-side section will handle all backend calculations. There are more interactive guides and tutorials on the main Shiny website, shared above. We'll start with the UI.
# shiny application user interface

ui <- fluidPage(
  textInput("your_name", "Your Name"),
  textInput("your_email","Your Email"),
  textInput("candidate_first_name","Candidate's First Name"),
  textInput("candidate_last_name","Candidate's Last Name"),
  selectInput("department_id","Department ID", unique(department_data$`Department ID`)),
  selectInput("job_code","Job Code", unique(positions_data$`Job Code`)),
  numericInput("salary_step", "Salary Step", value = 1, min = 1, max = 5),
  selectInput("appointment_type","Appointment Type", unique(appointment_data$abbreviation)),
  textInput("supervisor","Supervisor Name"),
  textInput("work_address","Work Address (Street number and name only)"),
  downloadButton("downloadoffer", "Download Offer Letter")
)The UI code above consists of 10 inputs, identical to the inputs required by our inputs function. One benefit of using an interface to enter our inputs is that we can dictate how the information is entered. For example, in our code above, we allow our users to enter text for most of our inputs freely but only allow for dropdown selections for others (department, job code, salary step, and appointment type).
# shiny appication server

server <- function(input, output, session) {

  output$downloadoffer <- downloadHandler(


    filename = function() glue::glue("Offer Letter - {input$candidate_first_name} {input$candidate_last_name} ({input$appointment_type} {input$job_code}).docx"),

    content = function(file) {

      inputs <- offerletter_inputs(your_name = input$your_name,
                         your_email = input$your_email,
                         candidate_first_name = input$candidate_first_name,
                         candidate_last_name = input$candidate_last_name,
                         department_id = as.double(input$department_id),
                         job_code = as.double(input$job_code),
                         salary_step = input$salary_step,
                         appointment_type = input$appointment_type,
                         supervisor = input$supervisor,
                         work_address = input$work_address
                         )

      # read the offerletter and bring to environment
      df <- read_docx("offerletter.docx")

      # funcitnos to find and replace merge text (15 total)

      # replace "letterdate" with today's date
      df <- body_replace_all_text(df,
                                  old_value = "letterdate",
                                  new_value = paste0(month(today(), label = TRUE, abbr = FALSE ), " ", day(today()),",", " ", year(today())))

      df <- body_replace_all_text(df,
                                  old_value = "firstname",
                                  new_value = inputs$candidate_first_name)

      df <- body_replace_all_text(df,
                                  old_value = "lastname",
                                  new_value = inputs$candidate_last_name)

      df <- body_replace_all_text(df,
                                  old_value = "departmentname",
                                  new_value = inputs$`Department Name`)

      df <- body_replace_all_text(df,
                                  old_value = "appointment_abbr",
                                  new_value = inputs$appointment_type)

      df <- body_replace_all_text(df,
                                  old_value = "appointment_type",
                                  new_value = inputs$appointment)

      df <- body_replace_all_text(df,
                                  old_value = "jobcode",
                                  new_value = as.character(inputs$job_code)) #change numeric variables to character

      df <- body_replace_all_text(df,
                                  old_value = "jobtitle",
                                  new_value = inputs$`Job Title`)

      df <- body_replace_all_text(df,
                                  old_value = "unionname",
                                  new_value = inputs$Union)

      df <- body_replace_all_text(df,
                                  old_value = "stepnumber",
                                  new_value = as.character(inputs$salary_step))

      df <- body_replace_all_text(df,
                                  old_value = "hourlysalary",
                                  new_value = as.character(inputs$hourly_salary))

      df <- body_replace_all_text(df,
                                  old_value = "supervisorname",
                                  new_value = inputs$supervisor)

      df <- body_replace_all_text(df,
                                  old_value = "worklocation",
                                  new_value = as.character(inputs$work_address))

      df <- body_replace_all_text(df,
                                  old_value = "signdate",
                                  new_value = paste0(month(today()+5, label = TRUE, abbr = FALSE ), " ", day(today()+5),",", " ", year(today()+5)))

      df <- body_replace_all_text(df,
                                  old_value = "yourname",
                                  new_value = inputs$your_name)

      df <- body_replace_all_text(df,
                                  old_value = "youremail",
                                  new_value = inputs$your_email)

      print(df, target = file)

    }
  )
}The server code above does a few things. The code is wrapped in the "downloadHandler" function and is executed when our end-user clicks the "Download Offer Letter" button. It first calls and runs our inputs function, and then feeds the user's inputs into a now deconstructed find-and-replace function. Lastly, it "prints" the file – effectively saving it with the same naming convention as chosen previously.
# run applicaition

shinyApp(ui, server)Lastly, the Shiny application is initiated (as shown in the above code). You can find a working version of the application through the following link if you want to check it out: https://matthanc.shinyapps.io/dynamicworddemo/.
Closing Thoughts
The examples used in this tutorial are somewhat limited in regards to the capabilities of the packages used. For instance, the officer package includes functions to create Word (.docx) and Powerpoint (.pptx) documents from the script line, without the need for an external document with placeholders. Similarly, there's much more we can do with Shiny to improve and stylize the application's interface.
If you're interested in playing around with the scripts, you can find the code on Github here: https://github.com/matthanc/dynamicword/
Additional Resources
- R: https://www.r-project.org/
- Rstudio: https://www.rstudio.com/
- Tidyverse: https://www.tidyverse.org/
- Shiny: https://shiny.rstudio.com/
- officer R package: https://davidgohel.github.io/officer/
- Tutorial files: https://github.com/matthanc/dynamicword/